24 November 2011

Craftings: Tie Bracelets

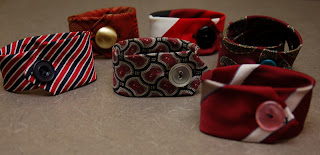
So I had a ton of tie ends (the skinny tails), left over from making a tie skirt1 a couple years ago.  I figured I could put them to good use, and finally decided I could make little cuff bracelets out of them and some cute vintage buttons I inherited from my mom and grandmother's sewing collection.

I measured them on my wrist, folded over the not-pointy end and stiched it closed.  Matched a button to each tie, then sewed a buttonhole on the pointy end.  Boy, it's been a while since I machine-stitched (okay, any stitch) a buttonhole, and wow did I really suck at it.  This is one of the later (and better) ones.  Ugh.

On my wrist!

A fleet of them!  (I have three others that aren't pictured because I did them on an earlier night and they were already in my jewelry drawer)

I made a couple double-length ones that could be chokers, or doubled up on the wrist.  Doesn't this one look so academic? :)


1 Todd Oldham taught me how, in, like 1993.

23 November 2011

Craftings: Cardboard Star Wreath


So I've been on quite the crafting binges lately.  And a lot of them have involved reuse of otherwise unused objects.  Partly because of thrift, and partly because we live on an island now, and I'm a lot more sensitive to our waste these days.  Not that I wasn't before, but when you live on a very small pinpoint in the middle of the sea from which our garbage gets shipped, anything I can do to recycle or upcycle seems prudent.  Anyhow, I saw a how-to online for cardboard 3-D stars (which will be perfect for Christmas cards later this year - we'd already recycled a ton we'd saved before we moved).  So I took a cereal box and pizza box that otherwise would have gone in the recycling bin, grabbed my x-acto knife, and got to work!


Then I painted my stars a silvery sage green, plus an extra pearly coat on the smaller stars.


Some I left cardboard-colored, scored, and folded them into 3-dimensional stars. 


Then I grabbed a nasty wire hanger (you know, the cheapy ones that your dry-cleaning comes back on - blech), fashioned it into a circle, bent the top back into a loop, and then hot-glued the crap out of it on the back.


Stuck the 3-d stars on top of the flat green ones, making sure to gob them with hot glue wherever they touched the stars under them.


Close-up of the bottom.


On the door!  There's a sheer shimmery ribbon that matches it quite well that's looped around the top where the hook is - but I may take it off.  Haven't decided.


20 November 2011

Chex Mix, Hawaii-Style

So I passed by some Crispix mix in a store a few weeks ago that had furikake in it. (a Japanese seasoning for steamed rice that has sugar, salt, sesame, and seaweed in it - don't turn up your nose until you try it, it's good!)  I love love love a good chex Mix, but was unwilling to pay the confiscatory price they were asking, so I started searching for recipes and found this and this.

I adapted the recipes to what I had and scaled it down to one pan (and the popcorn, while I'm always game for popcorn, just seemed to be too much of a textural contrast with the cereals - maybe on its own, it could be good).  Also, I just can't see dumping an entire bottle of furikake in.  Maybe it's my mainlander tastes, but I think that much furikake would make it taste very one-note.  I put in less than half and I thought that was plenty.  You could still get the sweet/savory/salty thing without any one flavor domineering.  I didn't have Tabasco, so I substituted in a few shakes of cayenne pepper - and could probably have used a little more.  I don't like nuts in my chex mix, so I swapped in more cereal for them.  And when I poured the sugar goo into the pan, it seemed like way too much, so I wound up adding at least another cup of (combined) cereal and pretzels.  I also think it wound up a little greasy, so I cut back on the oil just a bit.  And don't use the furikake that has bonito flakes in it.  Unless you like fishy chex mix.

Furikake Chex Mix

6 c. cereal: Corn Chex, Rice Chex, Honeycomb 
(I like 3c. Rice Chex, 1c. Corn Chex, and 2c. Honeycomb)
1 c. pretzels (I used pretzel goldfish, because, hey, they're cute)

0.5 c. butter
1/4 c. + 2 T. sugar
1/4 c. + 2 T. corn syrup
1.5 T. soy sauce (shoyu here in the islands)
1 T. worcestershire sauce
1/4 c. oil
Dash red pepper
2-3 T. furikake

Line a large roasting pan with foil.  You'll be glad you did this, because the syrup gets super-sticky as it bakes.  Heat oven to 250 degF.  Pour cereals and pretzels into pan.

In a small saucepan, melt butter over medium-low heat and stir in sugar until it dissolves.  Add corn syrup, soy sauce, worcestershire sauce, oil, and pepper.  Pour syrup over cereal in pan and stir well to coat.

Bake for about an hour - maybe longer - until it is crunchy.  Stir every 10 minutes.  Stir in the furikake after 20 minutes.  If you don't have furikake, you can do what others have suggested and use a mix of toasted sesame seeds and a little salt.

Make sure you store this quickly in an airtight container or bag because it sucks up moisture and gets sticky quickly, even if you don't live in the middle of an ocean.

Very ono.  And remarkably addictive.

17 November 2011

Craftings: Stained Skirt Reclamation

About a year ago, I bought a lovely basic grey skirt.  Knee-length, goes with lots, fits well.  So you can understand my dismay when, on the second or third wear, I stained it by sitting on a sharpie or pen or something.  Well, I couldn't bring myself to get rid of it, even though there was a big black stain on the caboose, so I set it aside, figuring I could wear it with long jackets or sweaters or something.  Which was maybe once. I mean, I didn't know what exactly I could do to cover it without the covering looking worse than the stain itself, you know?  But I figured I could come up with something when I had more time and ambition.

The original stain.  Mid-project, from underneath. :(

Then, I held a bridal shower which left me with hundreds of surplus buttons.  Perfect!

And unemployment leaves me with plenty of time!  Perfect! (well, perfect for crafting, at least...)

So, I parsed out all they grey, black, and pearly buttons.  Stuck one over the stain, and then started sewing more on, randomly.  And kept sewing - I wanted a thicker covering of buttons at the bottom hem, tapering up towards the waist.

The back, with stain now cleverly hidden.

Things I Underestimated About This Project:

  1. The amount of time required.  I didn't sew each button more than 2 or 3 loops, but each one is individually knotted, and that takes a while.  This was a 3-evening project!  I didn't anticipate it taking more than a night.
  2. The forethought required in achieving a "random" pattern.  It was hard to scatter buttons so that they weren't equidistant from their neighbors!  I had to keep shifting them and adjusting before sewing them down.
  3. The weight of all those added buttons.  This skirt weighs close to a pound now!

Extra buttons sewn into the lining for those I will invariably lose!


My reclaimed skirt!  From the front.

16 November 2011

Craftings: T-Shirt Refashioning

So I've been addicted, in my unemployment, to pinterest, where in a 5-minute span, I can grow my project-list exponentially.  But, I now have time for all the projects I've accumulated for the past seven years!  So I've been doing a lot of crafting and DIY projects.

One recent obsession: refashioning t-shirts into new things.  I'm kicking myself for giving away so much of my clothing before we moved - I could do so much with them now! :(  Well, Goodwill has provided me with some cheap supplies!

I found some directions to make scarves/necklaces out of t-shirt jersey material.  I cut a bunch of strips/loops from t-shirts, stretched them so they roll up on themselves, and assembled.  What fun!


 Made this one because I loved a former colleague's combo of purple and lime she wore one day.

  Cut spirals out of t-shirts.  In retrospect, I'd have made them larger slash used a larger shirt, because this scarf is a little scrawny.


I was concerned that this one plays a little too 80s - but it actually looks kind of cute with a darker kelly green top and white skirt.

  Finger-knit braided bracelets - what a fun (and VERY instant-gratification) technique!.


 Chrysanthemum pin made from sleeve scraps.

  If I were to do this one over I'd have made it shorter and thicker.  But I did dye this one myself, and the pink shows a nice subtle variegation.  I also achieved this pink using black food coloring and boiling water. Pink was the only tone that stuck to the cotton.

  This one's going to a friend. :)

 This one, too. :)

 But this one I'm keeping.  To me, it's very oceany.  And makes good use of a bunch of surplus buttons!  It's a hybrid scarf-necklace (scarflace?  ew, no) made of long loops doubled-up on themselves.  But I've worn it so it cascades a little more.

There are more t-shirt projects coming, as soon as I can get back to a thrift shop! 


15 November 2011

Adventures in Shave Ice II


Went back up to Hale'iwa today and tried Aoki's Shave Ice - which was not-crowded and right across a gravel lot from the always-crowded Matsumoto.  

First, they weren't crowded with tourists.  Which we aren't any more. :)
Second, they had more pleasant seating out front.  And just seemed cleaner than Matsumoto.
Third, they had some interesting flavors - including Blue Hawaii, which might be one of my top-5s now: coconut, pineapple, vanilla, and blue.  That and the ubiquitous lilikoi, the standard by which I will judge the island's shave ice.  I am also looking forward to trying the coffee, cream soda, and butterscotch syrups.


They were a little weak on the syrup, which is sometimes fine - because the sugar crash after Matsumoto can be rather unpleasant.  And they have a darling little antique cash register on the back counter.  And a penny-squisher.  Word.